In the eleventh part of our Jetson RACECAR build we construct a breadboard to interface the car with the Jetson using an Arduino ROS Node. Then we install the software, and test using a ROS teleoperation node to control the car with a game controller to boot. Looky here:
Background
In our earlier Motor Control and Battery Discussion we had planned on using a Teensy micro controller to interface the Jetson to the steering servo and ESC on the car. After working with the Teensy for a while, I realized that in order to upload a sketch to the Teensy (a sketch is a program that is uploaded and then runs on an Arduino type of processor) an updated version of the Arduino software is needed.
The updated Arduino version is not readily available for the Jetson. An alternative is to run the Arduino software from a PC, such as the host used to flash the Jetson. At the end of the day, it is easier just to replace the Teensy with a regular Arduino and use the Arduino software natively on the Jetson. That means that during development one doesn’t have to bounce back and forth between different development machines.
In the video, an Arduino Nano is used. The Nano was selected because the parts were already on hand, if buying new, an Arduino Micro or clone probably would be the choice.
Note: These are relatively inexpensive, and may use substitute parts. For example, the Arduino Nano uses a CH-340 serial to USB chip instead of a FTDI chip. See the note at the end of the article.
Arduino ROS Node
There are ROS bindings available for the Arduino. Money quote from the ROS wiki:
The Arduino and Arduino IDE are great tools for quickly and easily programming hardware. Using the rosserial_arduino package, you can use ROS directly with the Arduino IDE. rosserial provides a ROS communication protocol that works over your Arduino’s UART. It allows your Arduino to be a full fledged ROS node which can directly publish and subscribe to ROS messages, publish TF transforms, and get the ROS system time.
In our case, we will use the Arduino ROS node to send PWM pulses to the cars steering servo and ESC using the Arduino Servo library.
Construction
Here’s a wiring diagram:

This is a straightforward build. The parts from the video:
- Arduino Nano
- Adafruit Perma-Proto Half-sized Breadboard or in black: Proto Breadboard PCB
- Right Angle Header
- Hook Up Wire
along with a soldering station: Hakko FX888D-23BY Digital Soldering Station
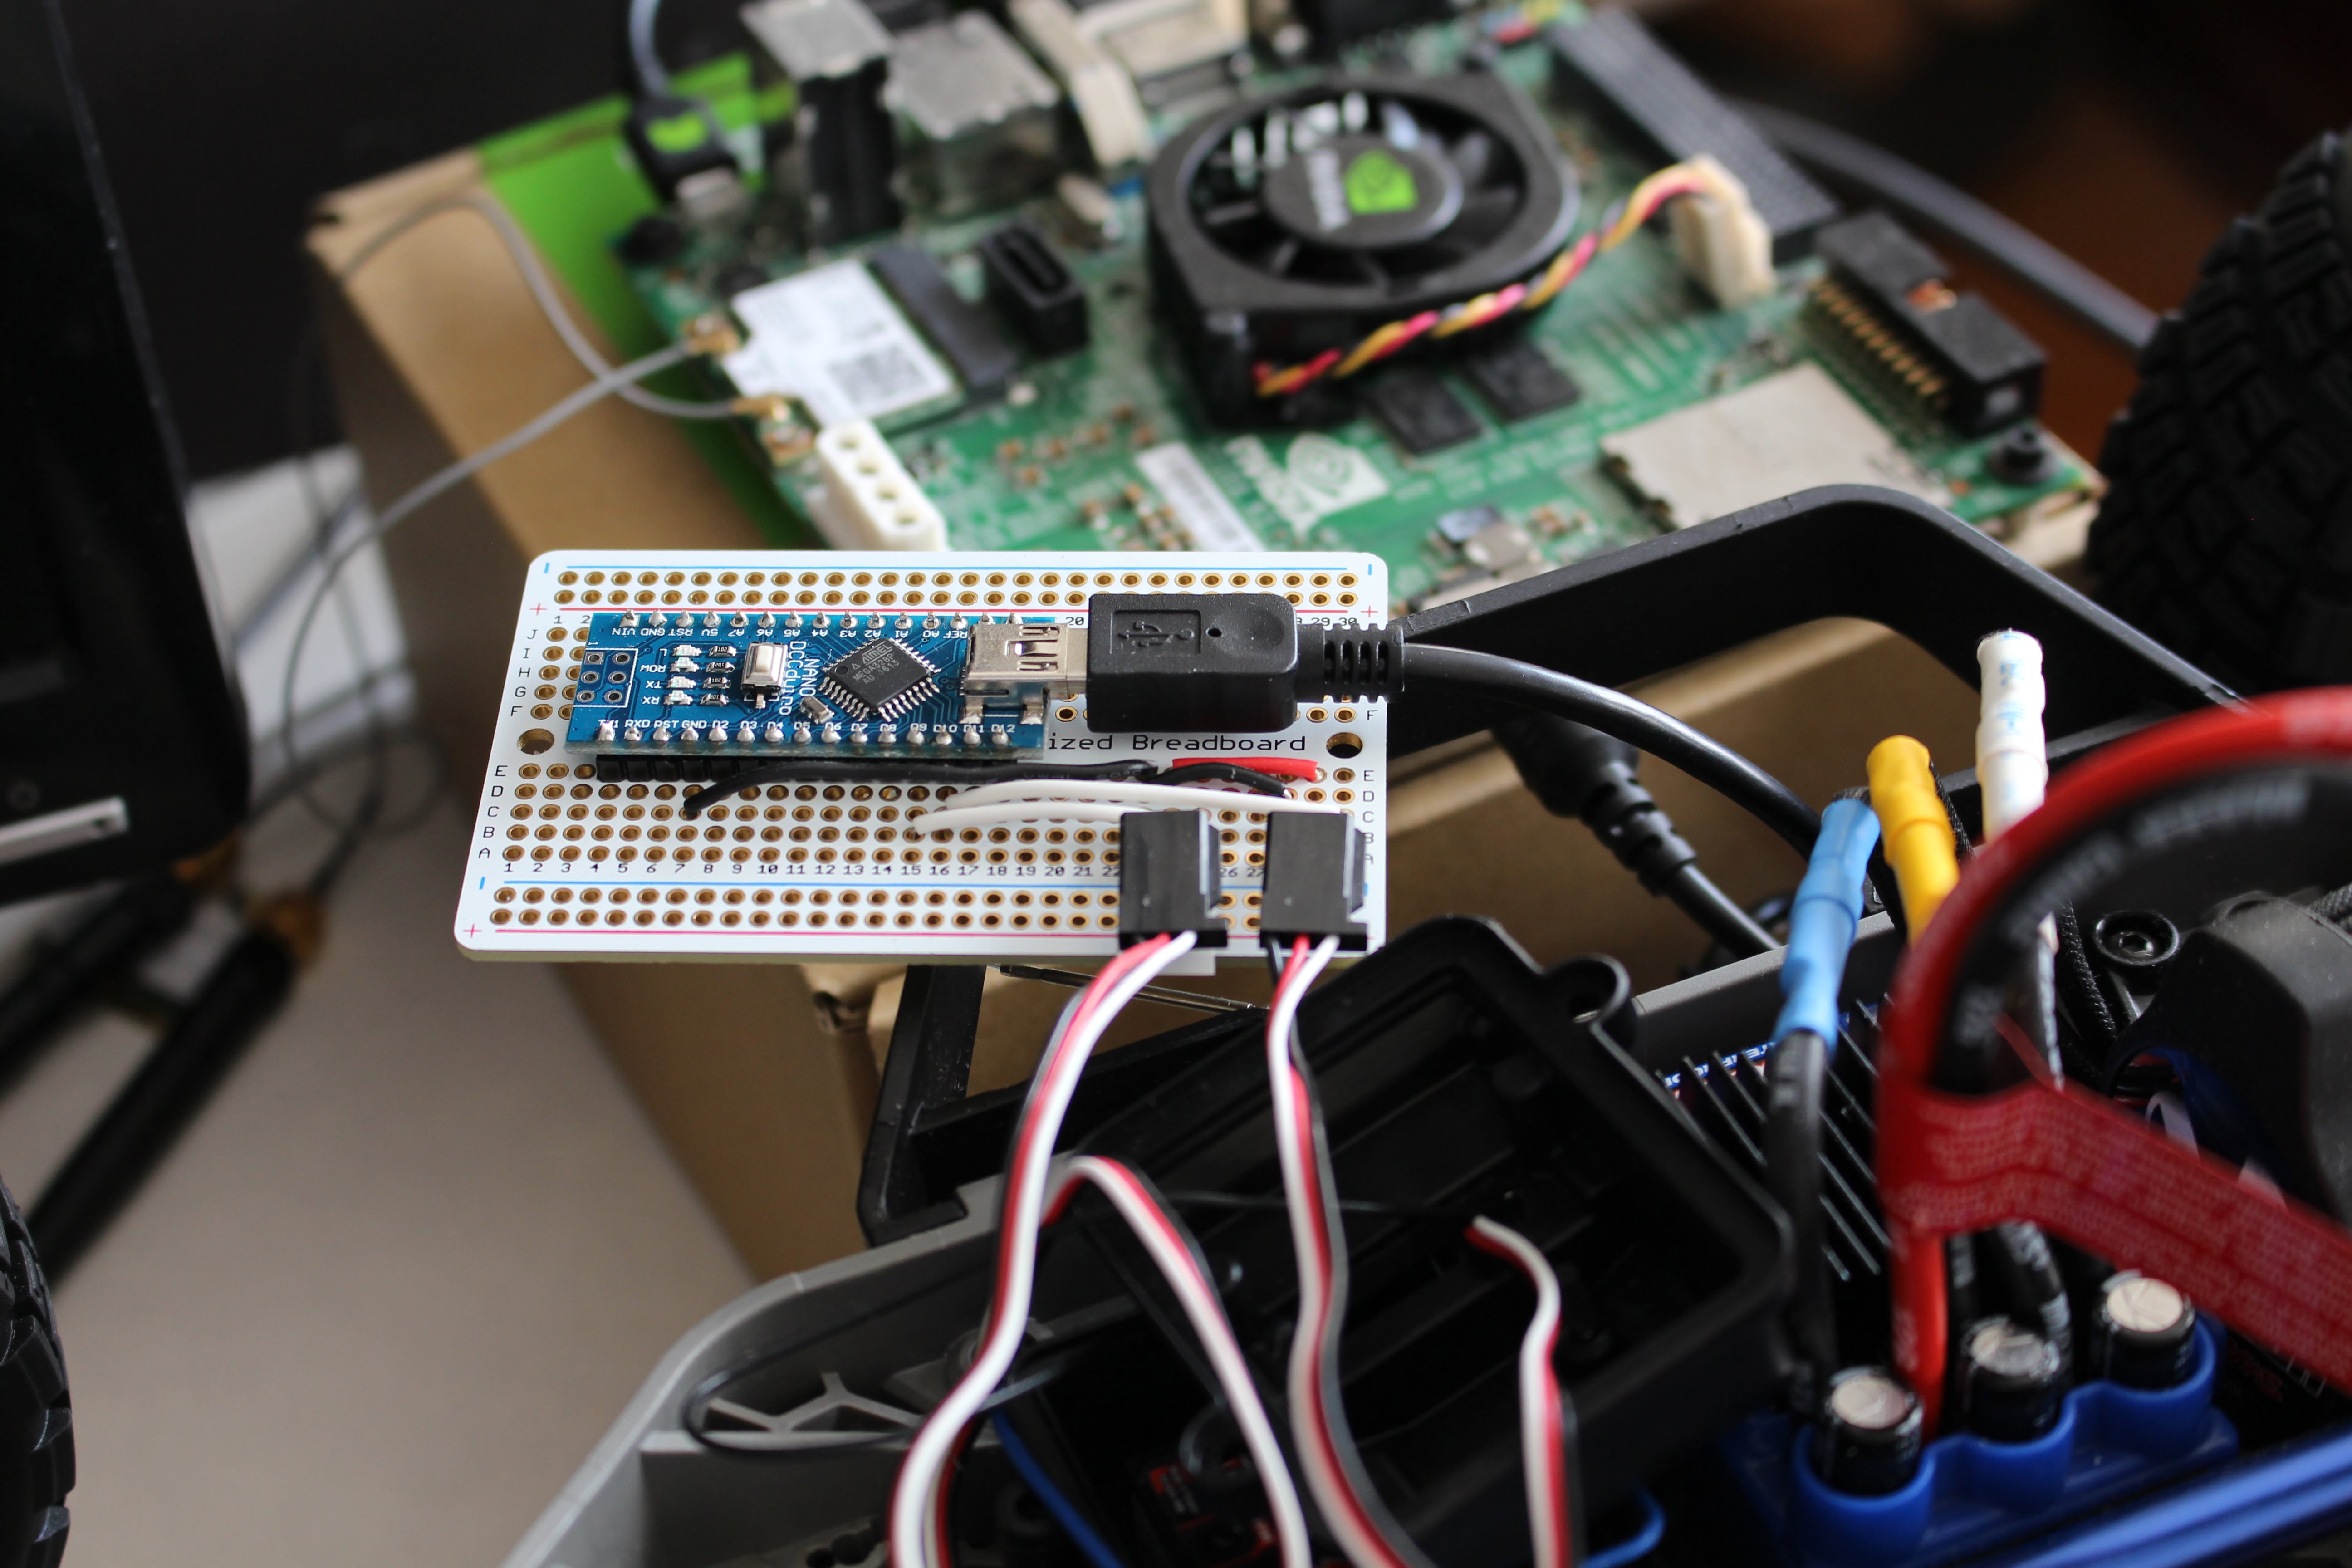
One note, notice that the steering servo receives 6V power from the ESC header, which gets power from the car battery. The Arduino receives 5V power over USB, and sends signals to both the steering servo and ESC. To avoid nasties, an isolation circuit can be added.
Make sure that the car battery is disconnected from the ESC before wiring the Arduino breadboard to the car. This Nano uses a mini USB connector.
Here’s what it looks like after assembly and connected to the car, with the USB from the Nano connected to the Jetson:
Software Installation
The prerequisites for software installation are ROS and the appropriate serial to USB driver for the Arduino. FTDI is usual choice for standard Arduinos, here’s an article for building a kernel and installing ROS on the Jetson TK1.
Once the prerequisites are met, you can go to the installJetsonCar repository on the JetsonHacks Github account. Install the repository on the Jetson, and then run the installation script:
$ git clone https://github.com/jetsonhacks/installJetsonCar.git
$ cd installJetsonCar
$ ./installJetsonCar.sh
Next, go to the Arduino sketchbook and open the jetsoncar sketch. This should be in ~/sketchbook/jetsoncar. The name of the sketch file is jetsoncar.ino Open jetsoncar.ino, setup the Arduino software for flashing by selecting the correct Arduino model and port number, and then upload the sketch to the Arduino.
Operation
In the video, a Nyko game pad controller was used. This controller is from the JetsonBot project. The game pad needs to be paired over Bluetooth with the Jetson. The Jetson in the video has a an Intel 7260 Wireless/BT Network Interface Card (NIC) card. Here’s an article on installing the NIC. You’ll also need antennas.
Then open a separate Terminal window for each command:
$ roscore
$ rosrun rosserial_python serial_node.py /dev/ttyUSB0
$ roslaunch jetsoncar_teleop nyko_teleop.launch
You should be able to examine rostopics being fired by the controller. In order to send cmd_vel topics, the ‘Y’ button on the game controller must be pressed while controlling the left joystick, right trigger, or the right button about the right trigger. The ‘Y’ button is commonly called a deadman switch in this use case.
Note: Usual safety warnings apply, make sure that the car is in stable position and the tires are free from contact with surroundings.
Once you are satisfied everything is working correctly, connect the car battery, and hit the power button on the ESC. The controller should then control the car actions.
Conclusion
As with most of these articles, this is not a step by step operation on how to build a project. It requires a bit of ingenuity on the readers part to gather the parts needed on their own, and as such these articles are more for providing a framework on how to build a project like this. Some of the software will need to take that into account, but there should be enough there to give a good starting point for your own build.
Note on Arduino Nano
As noted earlier an Arduino Nano is used in this project. This will probably be revisited with a new model. In order to get this particular Nano to work, a kernel module is built to support the CH-340 serial to USB chip on the Nano. Most Arduinos use FTDI chips, but these are somewhat more expensive than the CH-340, so some Chinese clones substitute the part. The option in the Linux kernel is:
USB Winchiphead CH341 Single Port Serial Driver
One issue that presented itself is that if the rosserial node was used more than once, the Nano would hang. This appears to be related on this particular chip to the pyserial library. On the Jetson, pyserial is 2.6 which exhibits the issue. Rolling back to version 2.5 seems to fix the problem for this particular board.
To install pyserial 2.5:
sudo apt-get install python-pip -y
pip install –user ‘pyserial==2.5’
For more information see:
https://github.com/ros-drivers/rosserial/issues/219
32 Responses
Exactly what I was wanting to know, thanks!
Hi,
I have been following this project for a long time. Thank you for your efforts to put these videos for learners like us. I am planning to follow the Jetson Racecar tutorial series to build my own RC car. I would be thankful if you can answer some questions. 1. In my country the traxxass model that you are using is not available, will other traxxass model work the same way? 2. This particular video no.11, you used an arduino for serial communication with ROS. Whats not clear is that last video you hinted at using Teensy microcontroller. Do you have plans to use that as well? How about the VESC for fine motor control in subsequent videos? Also, from the speed it seems that for indoor use still speed is way too much to carefully navigate the car. What are your plans next to rectify this? Thanks
Hi Alex,
In answer to your first question, most RC cars work in the same manner as the TRAXXAS Rally in the video. In most cases, the steering is controlled by a servo, and the ESC is controlled in a servo like manner. See:
https://jetsonhacks.com/2016/01/20/jetson-racecar-part-2-racecar-steering-control/
https://jetsonhacks.com/2016/01/26/jetson-racecar-part-3-esc-motor-control/
Typically both of these are controlled by PWM, which either a dedicated device like a PCA9685 or a micro controller like an Arduino can generate. The Jetson can also generate PWM signals, but it’s more involved (and annoying) to do so.
In answer to your second question, at the 0:42 mark I explained that the Arduino was selected over the Teensy because the Teensy could not be programmed from the Jetson itself. However it is still possible to use the Teensy, just be aware that you’ll probably have to use another machine to do so. The Teensy is mostly compatible with the Arduino, but UPenn is using it in a different manner for more fine grain control of the timing pulses. See: http://f1tenth.org and their repository: https://github.com/mlab-upenn/f1_10_code_public
The cars are pretty fast (after all they are race cars) and a car using the onboard TRAXXAS ESC goes at about a jogging pace at a minimum: https://www.youtube.com/watch?v=inr7BPh7cv8 As such, they’re not really indoor things unless you’re in a sports/concert arena or commercial building. If you use a VESC, the cars are much more controllable and can travel more slowly. The VESC requires some work to integrate into the car, and some specialized software which puts it into the intermediate roboticist level. Hopefully we’ll get to it, but the next steps are to get the car put together and get the sensors running. With that said, remember that the cars are 22″ (56cm) long and can go 40mph (65 kmh) which is beyond the scale of most indoor environments. And they WILL crash 😉
If you’re more interested in working indoors, a Rover is probably a better way to go. We’re starting a series on a new Rover project very soon, similar to: https://github.com/avirtuos/ros_hercules/blob/master/README.md A Rover can be used both outdoors and indoors, and travels at much more indoor friendly speeds.
Thanks for reading!
hi @kangalow,
Thanks for the detailed answer. I understand your point. Nevertheless, its a good learning project for me. The rover project looks very interesting. I will wait for your rover project. Many thanks.
The circuit in the bread board, two red wire linked together. What I am confused is there’s no input to the red wire ?
Is that right ?
The input to the red wire is from the header. The red wire acts as a bridge between the ESC and the Servo. The ESC provides + voltage from the car battery. Thanks for reading!
Thanks, I know, the ESC provide + voltage to Servo.
What’s more, It’s necessary to connect the battery’s GND to battery’s GND
sorry, It’s necessary to connect the battery’s GND to the arduino’s GND ?
The Arduino, steering servo and ESC have a common ground.
I really can’t thank you enough for giving me hope on a project I’m working on. The basic idea is to use a raspberrypi3 with an arduino node and a camera to control a rc car that uses ackerman steering with opencv (with the camera)(all this by the way with ROS). I’ve looked online and I think the rpi3 can handle both of them (I hope). I think my brushed motor esc blew out as well as the battery so I was thinking of buying something like http://bit.ly/2v1eCEi (I’m going toward the cheaper side since I’m a secondary student). You think buying a cheap brushless motor/esc will work with something like the rpi3? I greatly appreciate any help!
A brushless motor is a little harder to control at slow speeds, most of the motor controllers are programmed assuming that the user wants to go fast. If you’re using a Raspberry Pi, you should go over and take a look at http://www.donkeycar.com
It’s part of the http://diyrobocar.com community. Thanks for reading!
Yeah I’ve seen the donkey car before. So it is possible to control the brushless motor with the arduino?
Sure.
Will controlling the motor with the arduino node be the same with a brushed motor esc?
(specifically https://www.amazon.com/gp/product/B01LZHBJ85/ref=ox_sc_act_title_1?smid=A2WE34KST0BUEK&psc=1)
-Thanks!
Will it work in general with any brushed esc?
Not quite sure what you’re asking. There are many projects using Raspberrypi to control RCs, for example:
https://www.youtube.com/watch?v=UgP9COQIjGk
Github code: https://github.com/a1k0n/autorustler
The Teensy 3.2 is an Arduino compatible controller. The RC car in the video is a Traxxas Rustler, using a brushed motor.
I am no expert, but the vast majority of RC ESCs (regardless if they are controlling brushed or brushless motors) work from PWM pulses which are sent from the receiver on the car. I would suggest that you find one of the cars that most closely follows what you would like to build and study that so you don’t have to worry about the Jetson computer part of the project.
How can I change the button configuration for another controller? I have Logitech F710 and when I try all this, dead button is left button (lb) for me, not Y. I opened jetsoncar_joy.cpp and changed deadman_axis(4) to deadman_axis(3) at line 90; also changed
xButton(3) to xButton(2); and similar changes at leftButton(4), rightButton(5).
Then catkin_make it again and sourced it, but it still didn’t work. May you help me please?
You should not have to change the file jetsoncar_joy.cpp
The actual parameters for the game controller are set in the launch file, nyko_teleop.launch
Whatever you set the default parameters to be in the .cpp file, they get overwritten when the parameters are read from the launch file and applied.
Instead, create a F710 launch file, and configure the parameters as desired.
Hope this helps, and thanks for reading!
Hello, I have tried to change the launch file, it worked for deadman switch and throttle finally. Thank you very much for such a quick and kind response. This time the car goes only backwards and turns to opposite direction when I tried :D. I think it might be because of the pwm values in arduino code. Any suggestion on this one?
There is a switch on the back of the F710 controller which selects ‘D’ and ‘X’. I believe that the correct setting is ‘D’, you may want to check that and switch it.
In your video when you turn right it gives angular z as 0 but in my case it is 1; and it is 0 at left. Now I think it might not be from arduino.
Can I control the Car moving by keyboard instead of joy-stick with the same “jetsoncar.ino”?
Many thanks for your tutorial series!
Teleop works with the keyboard and joysticks.
Thank you, After watching some of your tutorials. I think this tutorial is a bit out-date. I decided to install some package based on https://jetsonhacks.com/2018/02/05/software-install/ . Then I control motor by using arduino instead of VESC, so I came back to here.
However, JetsonCar is installed unscessfully with the error “rosserial_arduino”notfound. Then I try to install ros-indigo-rosserial-arduino. The error “Unable to locate package ros-indigo-rosserial-arduino”. I am stuck in here.
In the other hand, I installed the Arduino IDE but it didnt work. I can not open it.
Updated: I found and fixed some problems:
1) My ArduinoIDE did not work because of Java problem. I removed then reinstalled Java. It worked now
2) The “rosserial_arduino” problem come from file installJetsonCar.sh Line 22 “sudo apt-get install ros-indigo-rosserial-arduino……”. All of indigo should be changed to kinetic (as I searched, indigo only supported in ubuntu 14.04, kinetic for 16.04).
3) in other to get the file jetsoncar.ino in sketchbook. We may also want to coppy the file -r Arduino\Firmware/* ‘home/nvidia/sketchbook’ instead of ‘home/ubuntu/sketchbook’
Hi Mark. i really appreciate your replying. it’s so helpful on my task. so, i could solve some problems by referring to comments. By the way, do u solve other problems? i mean can you control the car by using keyboard now? i can’t do now yet.
could you give some any idea for me please??
Thank you.
Hi Kim. Sorry, because I have not checked the comment.
In order to control the car by keyboard, you can based on the joystick.
msg = “””
Reading from the keyboard and Publishing to Twist!
—————————
Moving around:
w
a s d
anything else : stop
z/x : increase/decrease only linear speed by 0.5
f/g : increase/decrease only angular speed by 10%
CTRL-C to quit
“””
Based on the input from keyboard, you will calculate the twist.linear and twist.angular, then publish to a node. Arduino will subscribe this node, and control the car.
Hope it still can help you :d
Mark,
Can I teleop using tleop_twist_keyboard by just changing the subscribed topic (to /cmd_vel) or do have to make any other changes (I’m able to run the servo but not esc).
You should check your battery voltage for the car. The ESC requires a minimum voltage before working.
Thanks. I’m able to drive it now but only forward (also left and right), but not backward. Do I need to add anything in the Arduino code for the backward motion?
Hello I’m getting error while running the nyko_teleop.launch. I’m using a Red Gear Joystick on a HP laptop with ros melodic (I have edited the install.sh file for ros version).
error= “[jetsoncar_teleop_joystick-1] process has died [pid 28305, exit code -11, cmd /home/sajal/catkin_ws/devel/lib/jetsoncar_teleop/jetsoncar_teleop_joy __name:=jetsoncar_teleop_joystick __log:=/home/sajal/.ros/log/6e41c6ca-8d9b-11e9-b01f-b827eb2079c2/jetsoncar_teleop_joystick-1.log].”
hello great project i launched it on maverick strada mt I had to configure it for my gamepad it works torsion
how to remotely run the gamepad on another computer?